Harriet Bra in Silk Chiffon

Also known as, the prettiest item I have ever made.

img_1303

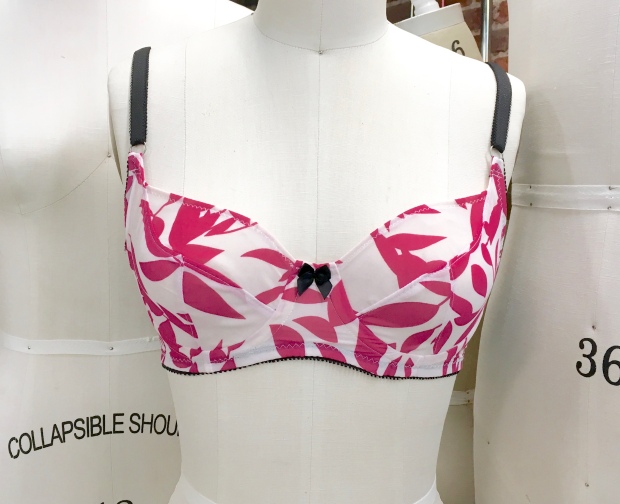
Have you ever finished a project and been so pleased with the results that you literally jumped up and down, hooting and screeching in pure excitement?  No?  Because that was me on Tuesday when I finished sewing this beauty.  I hadn’t even put it on yet.  I ran upstairs, busted into my husband’s office and could barely contain myself, pushing it in front of him to gaze at confusedly.  Then I tried it on. I’m super thankful it fit, because even if it had squished me into pancakes, I’m pretty sure I was still going to wear it.

This is my fourth Harriet Bra.  I made my first two at Camp Workroom Social last October; taught by the designer, the one and only Amy from Cloth Habit.  While I was thrilled to have made those bras and they felt comfortable at first, by the end of the day it was a very different story. But I love the design and shape it gives, so I was determined to keep trying.

img_1326

I made my third Harriet (un-blogged) a couple weeks ago, using a kit from Bra Maker’s Supply.  I did not make any adjustments to the pattern since I had a new and final version of the pattern and knew that Amy had made a few small adjustments since camp.  But the fit was still not right.  I thought the band was just too tight, so I added an extender giving me another 1″ of length.  But even with that, the center tips of the wires were digging into my sternum to the point of actually causing small bruises. Not a good look.

img_1327

After my trip to Philadelphia and making a couple of Madalynne’s Simplicity 8229’s, I realized that the shape of the bridge of my Harriet may be my problem.  So I traced the shape of the S8229 bridge and re-shaped the Harriet bridge to match. I also lengthened the back bands by 3/8″.  (So while my pattern size is 30D for the Harriet, my band is actually just over an inch longer than that.)

img_1269

You can see my modified bridge pattern piece here. The changes look small but are actually quite significant.

Those changes have made all the difference. This bra is not only beautiful, it shapes well – even without foam, and is comfortable.

img_1317

img_1320

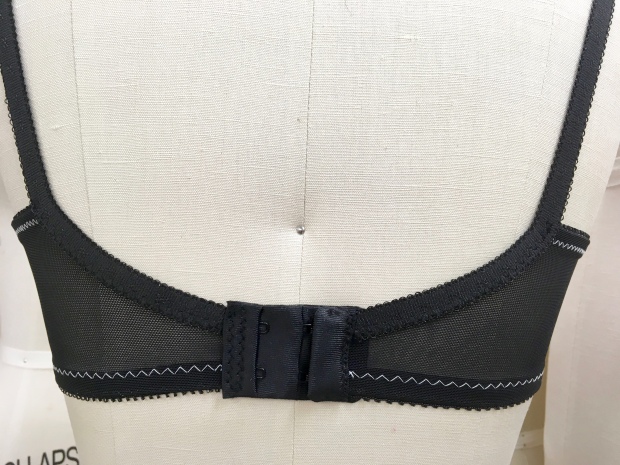
A classic U-shaped back.

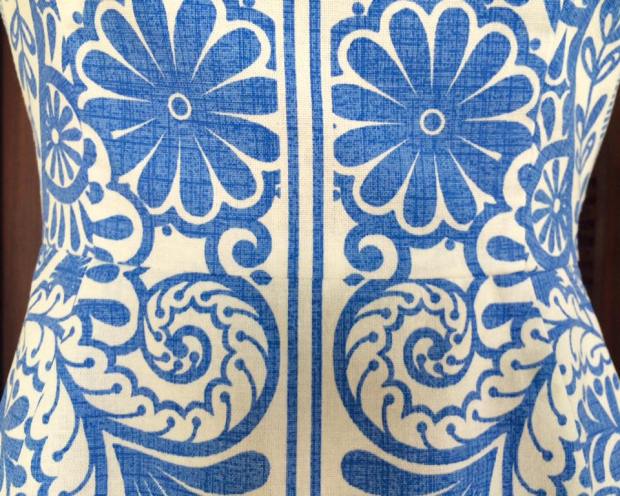
Most of the supplies for this bra came in a bra kit from the wonderful Tailor Made Shop. The outer fabric is another story. That is a silk chiffon that I picked up at Jomar-Swanson in Philadelphia last weekend.  I snatched it up as soon as I laid eyes on it.  My brain tried to talk me out of it – I rarely use drapey, semi-sheer fabrics in my sewing projects, and I really shouldn’t ever buy fabric again ever in my life – but having just come from a bra making workshop, I told myself that it could one day make a beautiful bra.  The yard of it cost me $2.  Totally worth it.

Though I will say, it was not the easiest fabric to work with. When I use it again for another bra and/or matching undies, I may try a stiffener to keep it from shifting around quite so much.

img_1335

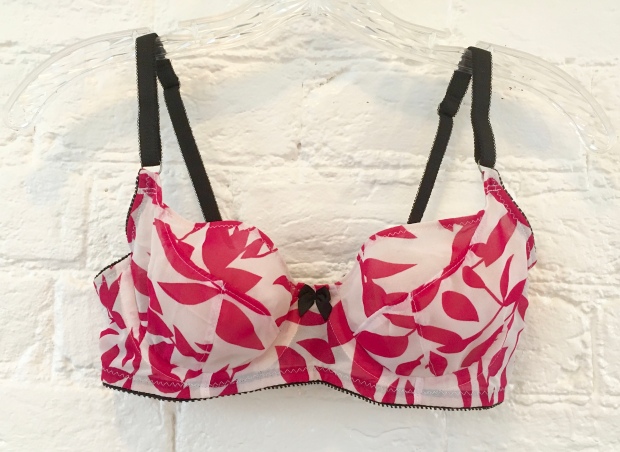
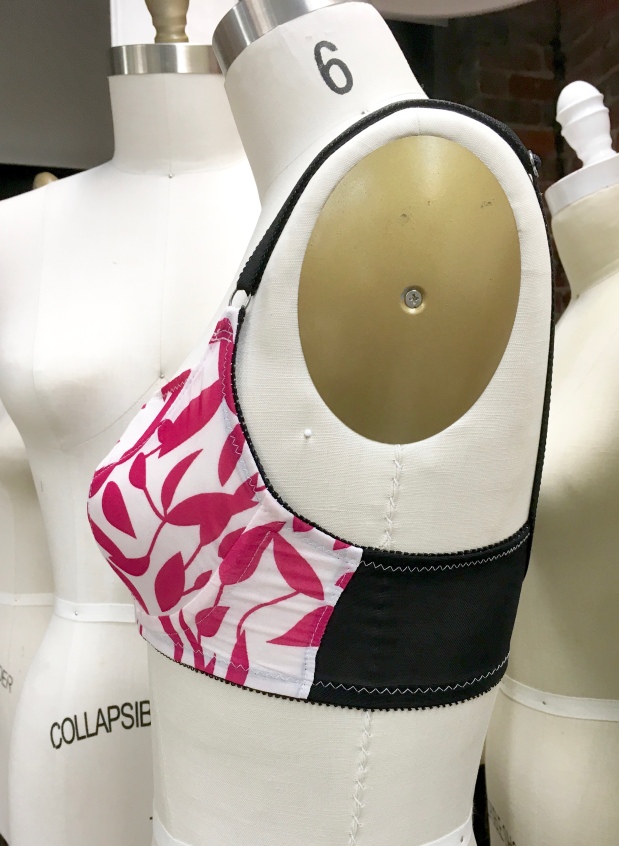
I made view C and lined the bridge, cradles and three cup pieces with sheer lining. Since I was not using a lace upper cup, I followed the instructions for view A for that portion.  For those looking for the nitty gritty, I cut the fabric and lining as one for the upper cup (using 505 Spray & Fix), lining the top edge along the selvedge to avoid fraying and finishing with 1/4″ clear elastic, but cut all other pieces separately so I could follow Amy’s instructions to get a nice neat inside with no exposed seams. I used power mesh for the band and a 2-row hook and eye since that fit the height of the band best.  I may  modify for a 3-row hook and eye for my next version.

img_1340

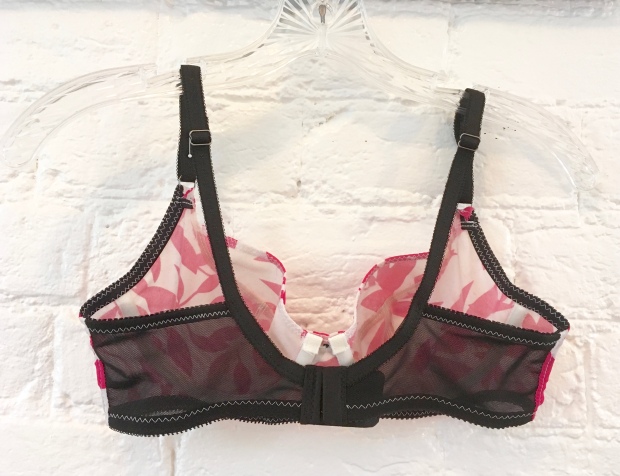
Rather than cut the casings at the stitch line at the center front, I fold them down for just a little extra padding underneath where they make contact with my skin.

And yes, there will be more versions.  Though I may stop blogging each and every one of them since my guess is that it is getting a bit annoying.

Pattern: Cloth Habit’s Harriet, size 30D
Fabrics: Outer silk chiffon from Jomar-Swanson, other findings from Tailor Made Shop
Modifications: Adjusted shape of bridge, lengthened bands
Photo Locations: Visual Arts Center of Richmond Fibre Studio

Ginger Jeans: Mind blown

I dislike trying on clothing in stores. Nine times out of ten, I leave the changing room disappointed. Not in the clothing, but in my body, and the fact that it doesn’t fit into industry standard clothes. I know this is silly. I know that industry standards probably fit less than half of the population, but nevertheless, I usually leave the store vowing to not eat again that day and to workout as soon as I get home. When people ask me why I sew, I’ve normally responded with a quick and easy answer like: (a) I will never show up somewhere wearing the same outfit as somebody else, or (b) that I can make an item *exactly* as I want it (more on this below). Those are two very valid reasons. But the reason I will likely never stop sewing is that it gives me the power to never judge my body against industry standards again.  Nobody (and no body)  deserves that.

This is my second pair of Ginger Jeans by Closet Case Files, a brand that in my opinion, sets itself apart by showing home seamstresses that we can, in fact, make anything we set our mind on.  (Heather is pretty much my hero.) Before I cut into my precious denim for this pair, I altered the pattern so that they would fit my body (no easy task given the 12″ difference between my was it and “full hip”): I took a wedge out of the back yoke and contoured the waistband to hug that lower back curve; since I used the high-rise version of the pattern (view B) this time, I lowered the waistline in front just a bit more than in the back to avoid peek-a-booty; and I straightened the skinny leg and then took it a bit further adding a mild flare to accommodate oxford shoes and fall boots.  And once that was done – and that took maybe an hour or two thanks to loads of useful tips from Heather – I cut and sewed my denim and slid these beauties on. And guess what. They fit like a glove. And more importantly, I even like the way they look on my body. Mind blown.

img_5272

img_5284

You’ll just need to trust me that there is no gaping in the back waist. I completely forgot to get that shot while standing on a rather busy street corner:

img_5275

As I mentioned above, a bonus to sewing your own clothes is being able to make them however you’d like. As you may have spotted, for this pair, in addition to the sizing alterations, I skipped the classic gold topstitching and opted for two shades of blue.  I was tentative about this at first but decided if I hated it I could always rip it out and re-do it.  Once I got started – I loved it.  And then I remembered Heather’s flare version here, and this happened…

img_9138

And, speaking of customizing, how often do your jeans literally match your top?!?

img_5294

I still have enough Cone Mills denim to make two, maybe even three, more pairs of jeans.  Now I just need to decide what each of those pairs will look like and how I’d like them to fit my body.  Imagine, make, wear – repeat. Sew forever.

Pattern: Closet Case Files Ginger Jeans, View B with mods for mid-rise and mild flare legs
Fabric: Cone Mills indigo S-Gene 12oz denim (88% cotton, 10% polyester, 2% lycra)
Worn withSimplicity 1462 in Anna Maria Horner Field Raindrops & Poppies cotton
Mural: “Overthink” by Onur for the Richmond Mural Project 2015 presented  by Art Whino Gallery

Kielo Wrap: My outdoor market dress

This is my *perfect* summer dress.  It also just happens to be made out of a tapestry I bought in the late 80’s/early 90’s, that was later used as a paint drop cloth (and there are green splatters of paint on this dress to prove it).

This was not intended to be a wearable dress; it was a practice run for a dress pattern by a designer I have never worn before. I had no idea I’d turn out loving it this much. The added bonus – it was super quick to put together. I can see myself making more of these for sure.

IMG_7513IMG_7514IMG_7515IMG_7521

My only concern with this dress pattern is that neckline and armholes are finished by simply turning under the fabric and stitching.  If I do make more of these dresses, I’ll likely draft facings instead.  I think they’ll hold their shape a bit better over time. Plus then there will be no visible stitching besides the hem.

Pattern: Named Kielo wrap dress, size 6
Modifications: Shortened to knee length
Fabric: Light cotton tapestry/former paint drop cloth

Carolyn pajamas: Take that, Target

I am not a fan of fast, cheap, it’ll-last-for-a-year-before-getting-tossed fashion for a variety of reasons that I won’t bore you with here (or at least not right now). One of the hardest items of said clothing for me to stop buying has been PJs from Target. They’re normally surprisingly well designed and *so* cheap. They keep sucking me in. Well, never again.

12742417_784765638335195_5574063675725582546_n

I had originally planned to do the collar & pocket top in solid orange, but it looked a bit like a bowling shirt.

12715270_784765645001861_895805803887540245_n

My first notched collar with piping, a fairly well-hidden pocket, and perfectly matched buttons!

12729054_784765665001859_7144437452938450977_n

I can’t believe I found vintage buttons that match so perfectly online.

Pattern: Closet Case Files’ Carolyn Pajamas
Fabric: 100% cotton ‘Metro Tile in Orange’ by Robert Kaufman (which I purchased 10+ yards of for a long-forgotten home project years ago) with scraps of orange Kettle Cloth gifted to me by my mum for the cuffs and piping.
Buttons: Vintage, glass, and hand-painted in the perfect color

Confession: Despite a large pile of different sewing projects in my queue, I’m almost finished cutting my second pair of these and have my fabric prepped for a third.

Vintage Vogue 2934: Joy

Vintage Vogue 2934: a joy to sew from the muslin that showed no alterations to the pattern were needed (the first time that’s ever happened) all the way through to the stress-free button and buttonhole that I finished just before kick-off of the Patriots/Jets game.

Made from vintage slate-blue wool lined with turquoise satin.  Shown with a basic skirt I made years ago from inside-out home decor fabric.

Vogue 2934 Front View

Vogue 2934 Back View

Vogue 2934 Side View

Vogue 2934 Sleeve View


Vogue 2934 Inside View


Vogue 2934


Simplicity 5996: My favorite make to date

When I started this dress last Saturday, I had no idea that two old Cynthia Rowley shower curtains (gifted to me by my sister, Emilie) plus my favorite dress pattern (modified Simplicity 5996) would turn out looking a bit like a vintage Lilly Pulitzer dress, but I’m glad it did. I’m not a huge fan of her style, but I’m very happy with how this dress turned out.


11703138_687930474685379_1977981608552678300_n

I love the stripe down the center front. I don’t love the placement of the ferns just below the waist line or that the pattern at the shoulders is off a bit, but it was unavoidable and I’ll get over it.

11214095_687930484685378_1871879183121226612_n

A very invisible back zip and perfectly matched pattern at the waist seam.

11692623_687930508018709_7275071039459548455_n

Pattern matching at the front waist seam — not too bad.

11707518_687930514685375_6563548566423032420_n

Pattern matching on the front bodice princess seam.

There’s just one problem: I tore a few holes in the lining when it got caught in the zipper earlier today. The result is not pretty, and if I wear this before I come up with a way to fix the issue, there’s a decent chance the zip will get stuck again and I’ll need to be cut out of it.